The Kirk Stereo Model 33
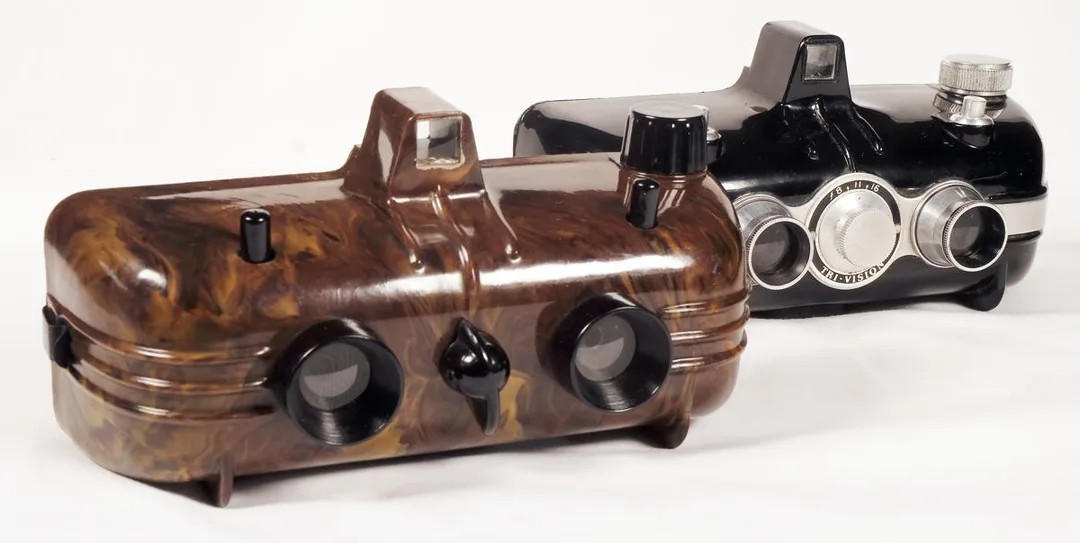
The Kirk Stereo Model 33 (L), Haneel Tri-Vision (R)
Since the earliest days of photography, stereo imagery has cycled in and out of fashion. One of these waves was set off by the launch of the Viewmaster in 1939, and the Stereo Realist (from 1947), Stereo Graphic (1955), and the ISO Duplex (1956) can be seen as part of the same cycle. These were “serious” cameras costing a significant amount of money, so there was space at the bottom of the market for something more affordable. Why not try Bakelite?
The design that eventually became the Haneel Tri-Vision was originally sold from 1942 as the Kirk Stereo Model 33; actually there is only Model 33. The main body is a quirky, curvaceous and streamlined Bakelite moulding in swirly chocolate colours, and a flat Bakelite back. In my example of the Kirk the back is distorted, and can’t keep the light out at the joints. And the shutter didn’t work. Soon the Kirk Stereo disappeared from the market, and the more or less identical Haneel Tri-vision was made by the Haneel company of Los Angeles from 1946-49 in several variants. Initially it was very like the Kirk, including the Bakelite back, but It seems likely that the Bakelite back was quickly recognised as having problems, as it was soon replaced by a second model with a metal back.
The 60mm fixed focus lenses stand forward prominently, and look businesslike; I have not been able to discover the optical design, but they may be a single achromat. A three-position aperture adjustment knob sits between the two lenses, giving f/8, f/11 and f/16 (but unmarked on the camera), nothing between.
Standing quite high on top is a simple Galilean viewfinder. The design symmetry is maintained by a pair of shutter release buttons which work in a rather odd way, as we shall see. Underneath is a standard tripod mount.
The film stock is Bantam (828), a 35mm paper-backed roll film launched by Kodak in 1931 specifically for consumer cameras. As there are no sprocket holes, the frames can be significantly larger then they can be on cine film; the roll is short, normally providing eight frames 40x28mm per roll. The Kirk uses film rather efficiently. The individual frames are 26mm wide by 28mm high, and they are spaced far enough apart that two stereo pairs are overlapped in an interlocking way. Thus you can get six stereo pairs on one roll, or by moving one lens cap back and forth between the lenses, twelve single images.
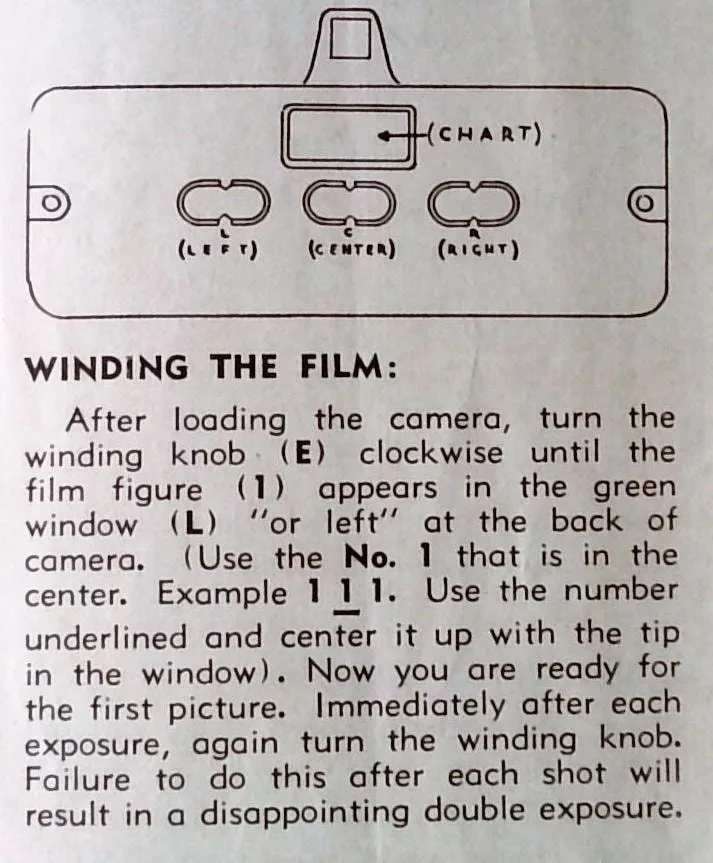
All this means that the transport of the film from exposure to exposure alternates between a short and a long move. There are three green windows on the back of the camera, and a table of movements which the photographer needs to follow, showing which printed number on the film backing paper needs to take its turn in which window. Winding on thus needs to be done with some care, and not in a hurry. Once the film is processed, the original stereo pairs need to be recovered in printing, as they are mixed up with one another.
The shutter, behind the lens, is normally operated with the right-hand button, which gives an instantaneous exposure of about 1/25s. A Bulb exposure is also possible; you pull up the left button, a very non-obvious move for a push-button, then press the right button down for the required length of the exposure. There is no cable release facility, so this is a bit tricky. Remember to push the left button down again after a Bulb exposure.
The film stock is Bantam (828), a 35mm paper-backed roll film launched by Kodak in 1931 specifically for consumer cameras. As there are no sprocket holes, the frames can be significantly larger then they can be on cine film; the roll is short, normally providing eight frames 40x28mm per roll. The Kirk uses film rather efficiently. The individual frames are 26mm wide by 28mm high, and they are spaced far enough apart that two stereo pairs are overlapped in an interlocking way. Thus you can get six stereo pairs on one roll, or by moving one lens cap back and forth between the lenses, twelve single images.
All this means that the transport of the film from exposure to exposure alternates between a short and a long move. There are three green windows on the back of the camera, and a table of movements which the photographer needs to follow, showing which printed number on the film backing paper needs to take its turn in which window. Winding on thus needs to be done with some care, and not in a hurry. Once the film is processed, the original stereo pairs need to be recovered in printing, as they are mixed up with one another.
The shutter, behind the lens, is normally operated with the right-hand button, which gives an instantaneous exposure of about 1/25s. A Bulb exposure is also possible; you pull up the left button, a very non-obvious move for a push-button, then press the right button down for the required length of the exposure. There is no cable release facility, so this is a bit tricky. Remember to push the left button down again after a Bulb exposure.

The shutter:
To get the shutter mechanism out for servicing should be simple, but in my case wasn’t. Remove the aperture knob (grub screw loosened with a 1/16” Allen key), remove the film wind knob after pulling out the spring clip inside the body. Then the interior moulding should come out – it is not a proper click fit, just a question of gently levering it out. The sandwich of steel plates comprising the shutter is then visible. The two shutter buttons may have some cement to keep them in, chip that away and then unscrew them both. At this point what should happen is that a push on the spindle of the aperture knob should cause the whole shutter mechanism to come out of the back of the camera.
In my case it was stuck tight, so firmly that I assumed that the visible ends of rivets, or at least some of them, were holding the shutter into the body. Not so! The next step was to drill out the four rivets that seemed to be in retaining positions. This allowed me to lever out the backplate, after which it was obvious that the rest of the structure should also be forced out – though with care not to crack the Bakelite body. It’s clear from this experience that the body has shrunk enough to grip the steel shutter structure with great force – indeed, I had to file the metal down significantly to get it back in at the end.
The shutter and aperture mechanisms are combined on a robust steel plate in three layers. All I had to do to get it working again was general cleaning, plus careful slight bending of the moving arm of the shutter. It’s not clear how it became bent, but it should run without actually touching the adjacent surface, and was rubbing gently, which is enough to stop it in its tracks.
After that it was just a question of reassembly with new rivets (14-gauge semi-tubular brass), filing down the edges of the plate as mentioned, to get it to fit its home in the Bakelite moulding, and replacing the rest of the parts in reverse order. The large interior moulding holds the shutter plate in place.
None of this makes the camera light-tight. The residual stresses from moulding the Bakelite back have caused it to curl a bit over time – I suspect actually quite soon after it was made – and there is a gap of about 2mm to let unwanted light in. This is despite a pair of substantial moulded ribs, clearly intended to counteract that very problem.
To try it out, I not only had to make up some film, but also put temporary black tape over the long edges before taking it into the daylight.
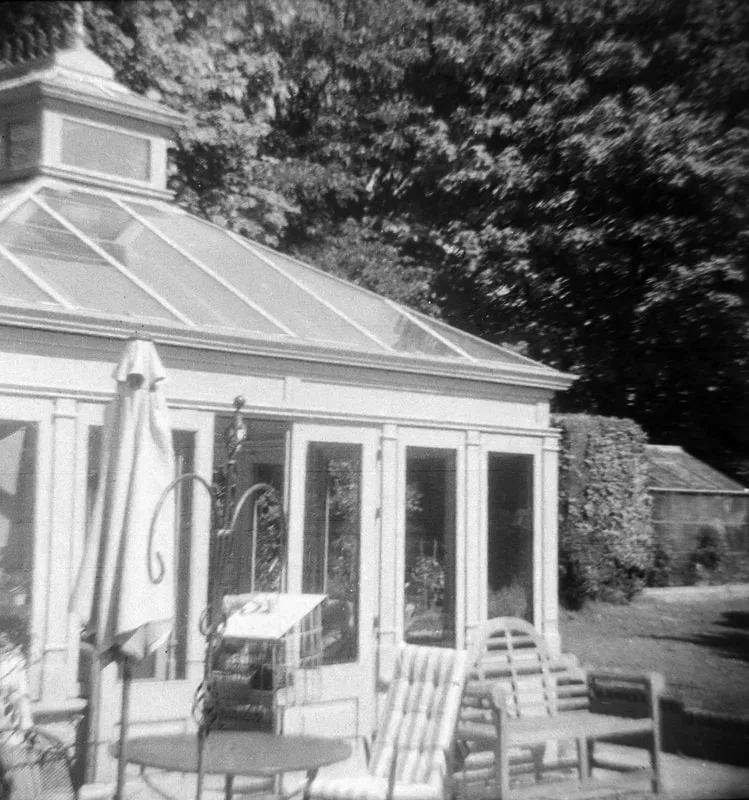
I made a roll of 828 monochrome film from modern materials - 120 Kosmo 100. Kosmo is made in Eastern Europe and is said to be from the Fomapan factory. The weather was bright and sunny. I used some green filtration to cut the exposure to somewhere nearer what it should be. I think the picture speaks for itself – the results from the Haneel are really dire!
I made a roll of 828 monochrome film from modern materials - 120 Kosmo 100. Kosmo is made in Eastern Europe and is said to be from the Fomapan factory. The weather was bright and sunny. I used some green filtration to cut the exposure to somewhere nearer what it should be. I think the picture speaks for itself – the results from the Haneel are really dire!