|
I frequently find myself wanting to work on panchromatic film in the darkroom. I may need to re-spool it, cut it to a smaller size, process it by hand, and so on. In the past I have had to do this entirely by feel, which is possible but often tricky and frustrating. Photographer Christopher Creighton remarked that he uses an infra-red (IR) viewer to do such work. What a brilliant idea! The particular viewer that he uses is one originally made as an accessory to a video game, and it’s only occasionally available used on eBay in the UK; and quite expensive too. So I thought I had better start from scratch and see what I could find. Illumination We want illumination that doesn’t fog the film, but will register on the viewing apparatus. To plan that, we need at least an approximate understanding of the spectral sensitivities of film and viewer, and the emission spectrum of the illumination. 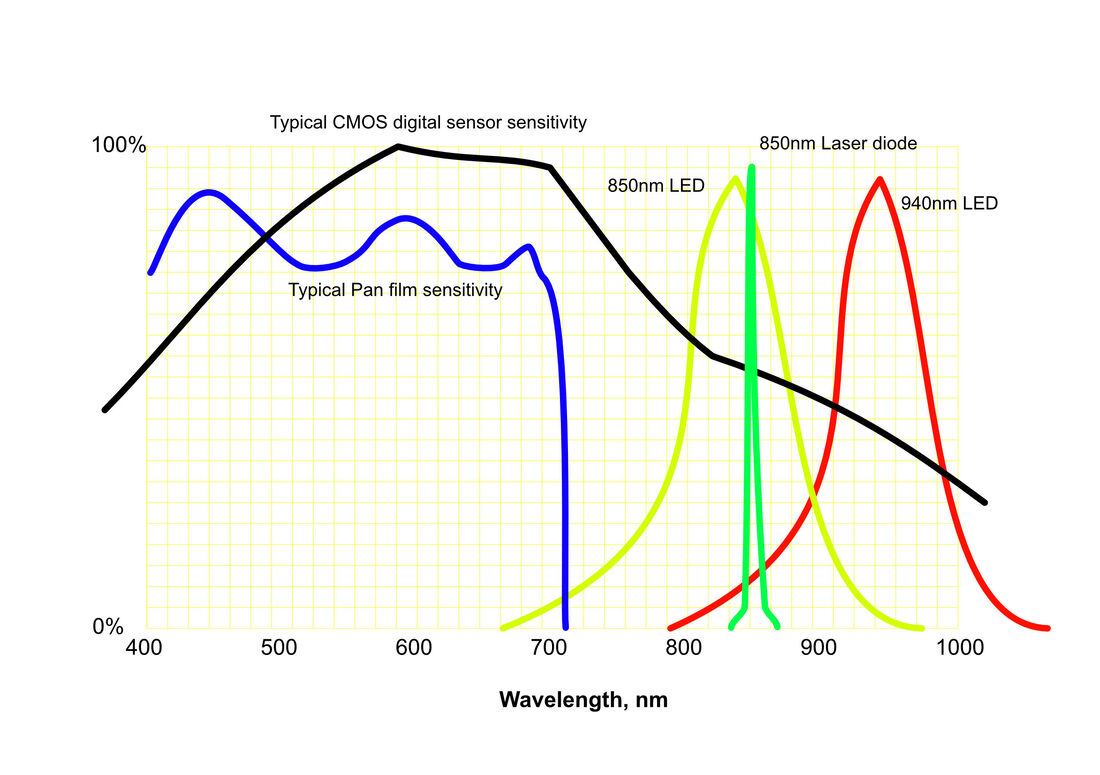 The graph sketches the possible relations between the components of the IR viewing system. The range of human vision is approximately 400-700 nm (nanometres) and panchromatic film (blue line) matches that reasonably closely. The near infra-red (IR) extends from 700 to about 1200 nm, which is the region we want to use. The sensor in the viewer is likely to be CMOS (black line), which has good though declining sensitivity in this region. In the graph are the outputs of possible IR illumination. What we need is plenty of light emission in the region where the viewer’s sensor can operate, but none in the region where the film we are working with is sensitive, because that would fog the film. The commonest IR illuminators work at 850nm, but as you can see (yellow line) there is some overlap with the film sensitivity around 700 nm, so the film will be fogged to some extent. There are three possible solutions:
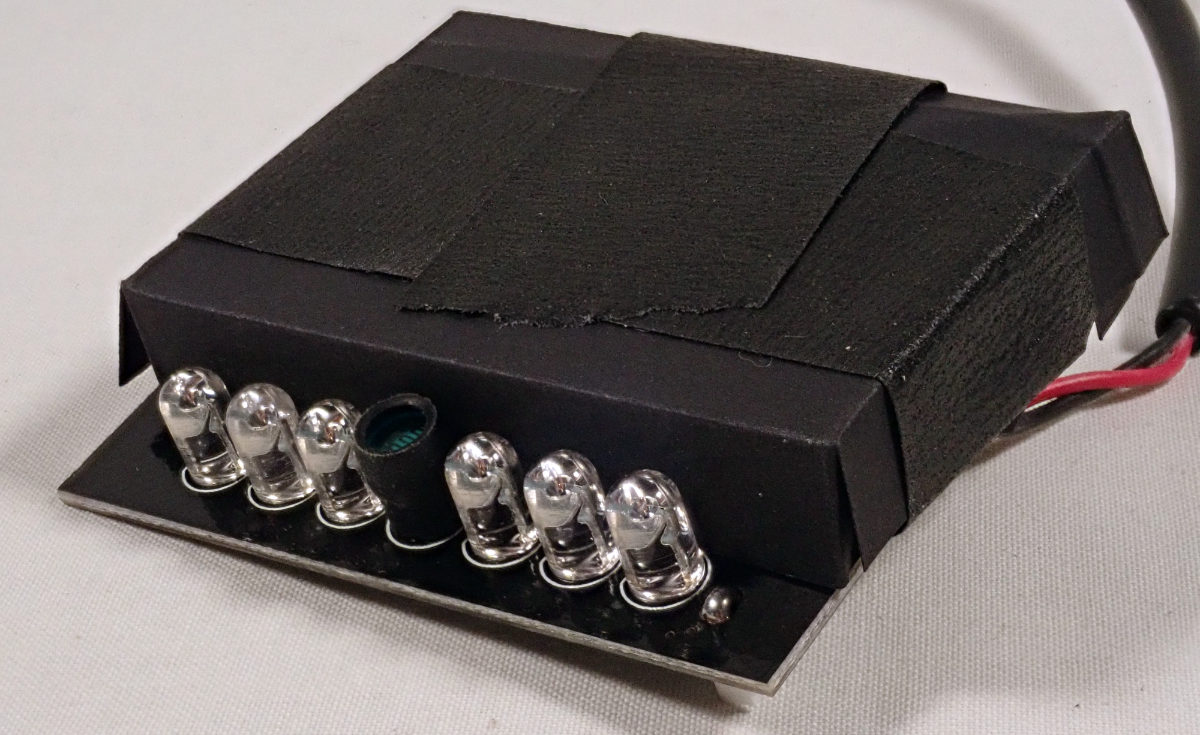
This is all a little simplified and a small amount of unwanted light may still exist, so the aim must also to be to limit the brightness of the illumination, which will maximise the length of time that film can be exposed before generating significant fog. The test I do is to try to get about the right brightness of the “lamp” (a little board with an array of 940 nm LEDs), as seen by my viewer, then leave a piece of film face up in the darkroom for 30 minutes with the IR lamp on, and a penny on the film so that fogging is distinguishable from any inherent fog from the film and processing. My LED board is for 12v DC, has 48 LEDs working at 940 nm, and is much too bright. However you don’t have to drive it at 12v, it will work with anything from about 7v upwards – 9v is convenient as suitable power supplies are common. I also mask off most of the LEDs leaving just 6 visible. I place this a metre or so above the workbench, reflecting off the white ceiling, and a 30-minute exposure doesn’t fog the film.
I did also try an 850nm laser torch – as above, laser diodes have a much narrower bandwidth than LEDs and so should not emit wavelengths close to the limit of sensitivity of the film. This also worked, not fogging the film in 30 minutes; but it is a more expensive solution and is no better than the 940nm array. A further option I didn’t try would be to get a piece of sharp-cut IR filter to subtract the tail of the emission from 850nm diodes. This material does exist, but so far I have only found suppliers of industrial quantities, with minimum orders which make it uneconomic. Viewer Thinking about the viewer, there are quite a few requirements for something that will actually be usable:
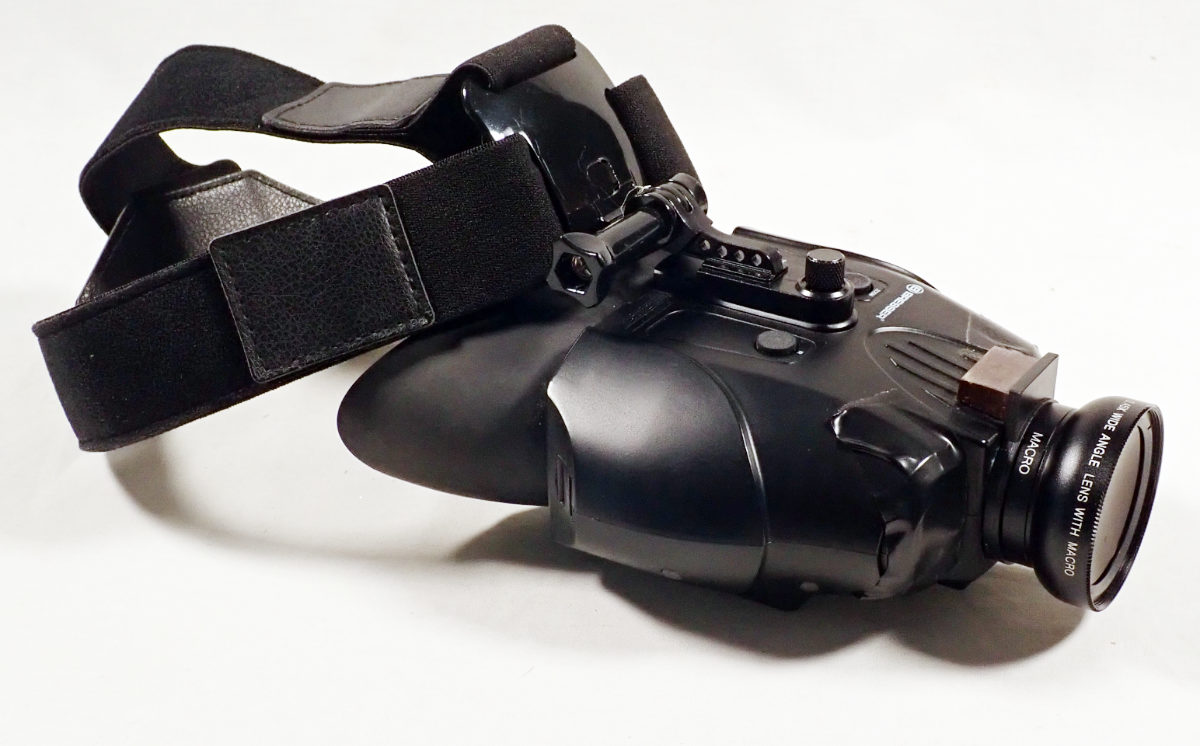
On that basis I found a viewer, binocular so-called but not really, made by a German firm called Bresser. It is one of the relatively few that don’t magnify, and there is almost no video lag. It is made for 850 nm and has two IR lights. It works in normal light too, and at first I thought that I just needed to turn off the built-in IR lights to use it with a separate illuminator. However that’s not the case; the IR switch not only turns on the lights, but also changes the settings of the sensor. To achieve IR sensitivity you have to turn on the built-in IR illumination, and for this application mask the lights with something opaque.
I made other adaptations too. It is 1x magnification, and focuses easily as close as necessary. The width of the scene is still insufficient though, so I bought a wide-angle adaptor x0.45, made to clip onto a mobile phone. I cut off most of the spring clip, and glued the part that the lens screws into, to the front of the Bresser. The Bresser’s rubber hood is too small to accommodate normal reading glasses, but the very narrow “pocket” ones do fit. I had to mask off one of the lenses of the reading glasses to avoid double vision. I did try a sheet of plastic Fresnel magnifier instead, but prefer the glasses. IR light is safe in these quantities, there is plenty of it in ordinary daylight. IR torch lasers, like other lasers, need to be treated with care – don’t look into the beam. High-power IR lasers should not be used, and anyway are quite unnecessary for this purpose. Costs I’m trying to keep the costs down of course. I have spent, in late 2022:
So for under £150 I have a system that allows me to work for a good length of time manipulating panchromatic film, including aerial survey film with extended red sensitivity, and see what I’m doing. By the way, do not use this with actual IR film which would certainly be fogged. On the other hand I don’t see any reason why I couldn’t use it with normal colour negative and transparency materials.
1 Comment
Christopher Creighton
17/1/2023 04:40:06 am
Thank you for the very detailed explanation, John. My approach to finding a proper IR light source and goggles was much (much) less technical and I guess that it was just dumb luck that it worked out for me. Regardless, it does work and actually makes handling panchromatic film in complete darkness quite easy. I'm glad that you are able to spread the word-- thanks! Leave a Reply. |
ReflectedAn occasional and irregular blog, mostly of photographic experimentation and photographic history. Archives
June 2023
|
 RSS Feed